一、Ansible Roles 概述
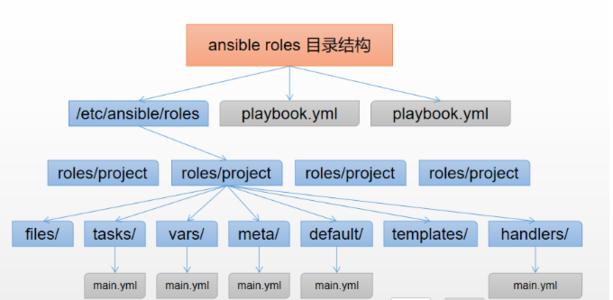
roles不管是Ansible还是saltstack,我在写一键部署的时候,都不可能把所有的步骤全部写入到一个’剧本’文件当中,我们肯定需要把不同的工作模块,拆分开来,解耦,那么说到解耦,我们就需要用到roles官方推荐,因为roles的目录结构层次更加清晰。
例如:我们之前推荐大家写一个base.yml里面写所有基础优化的项目,其实把所有东西摞进去也是很鸡肋的,不如我们把这些功能全部拆分开,谁需要使用,就调用即可。
建议:每个roles最好只使用一个tasks这样方便我们去调用,能够很好的做到解耦。(SOA)
二、目录结构
production                # inventory file for production servers
staging                   # inventory file for staging environment

group_vars/
   group1.yml             # here we assign variables to particular groups
   group2.yml
host_vars/
   hostname1.yml          # here we assign variables to particular systems
   hostname2.yml

library/                  # if any custom modules, put them here (optional)
module_utils/             # if any custom module_utils to support modules, put them here (optional)
filter_plugins/           # if any custom filter plugins, put them here (optional)

site.yml                  # master playbook
webservers.yml            # playbook for webserver tier
dbservers.yml             # playbook for dbserver tier

roles/
    common/               # this hierarchy represents a "role"
        tasks/            #
            main.yml      #  <-- tasks file can include smaller files if warranted
        handlers/         #
            main.yml      #  <-- handlers file
        templates/        #  <-- files for use with the template resource
            ntp.conf.j2   #  <------- templates end in .j2
        files/            #
            bar.txt       #  <-- files for use with the copy resource
            foo.sh        #  <-- script files for use with the script resource
        vars/             #
            main.yml      #  <-- variables associated with this role
        defaults/         #
            main.yml      #  <-- default lower priority variables for this role
        meta/             #
            main.yml      #  <-- role dependencies
        library/          # roles can also include custom modules
        module_utils/     # roles can also include custom module_utils
        lookup_plugins/   # or other types of plugins, like lookup in this case

    webtier/              # same kind of structure as "common" was above, done for the webtier role
    monitoring/           # ""
    fooapp/               # ""
三、创建roles目录
#1.可以手动创建
[root@m01 roles]# mkdir nginx/{tasks,handlers,templates,files,vars,meta} -p

#2.使用命令创建
[root@m01 roles]# ansible-galaxy init base
- Role base was created successfully
[root@m01 roles]# tree base/
base/							#项目名称目录
├── defaults					#优先级很低的变量
│   └── main.yml
├── files						#存放文件,copy模块
├── handlers					#存放触发器的tasks
│   └── main.yml
├── meta						#依赖的服务,安装服务前先读取该文件
│   └── main.yml
├── README.md
├── tasks						#主playbook
│   └── main.yml
├── templates					#存放包含变量的jinja2模板
├── tests
│   ├── inventory
│   └── test.yml
└── vars						#存放变量
    └── main.yml

8 directories, 8 files
四、Ansible roles依赖
roles允许你再使用roles时自动引入其他的roles。role依赖关系存储在roles目录中meta/main.yml文件中。
例如:推送wordpress并解压,前提条件,必须要安装nginx和php,把服务跑起来,才能运行wordpress的页面,此时我们就可以在wordpress的roles中定义依赖nginx和php的roles
如果编写了meta目录下的main.yml文件,那么Ansible会自动先执行meta目录中main.yml文件中的dependencies文件,如上所示,就会先执行nginx和php的安装。
[root@m01 roles]# vim /etc/ansible/roles/wordpress/meta/main.yml
dependencies:
  - { role: nginx }
  - { role: php }
五、重构playbook
1.配置主机清单和hosts
[root@m01 ansible]# vim /etc/ansible/hosts
[lb_group]
lb01 ansible_ssh_pass='1'
lb02 ansible_ssh_pass='1'

[web_group]
web01 ansible_ssh_pass='1'
web02 ansible_ssh_pass='1'

[db_group]
db01 ansible_ssh_pass='1'

[nfs_server]
nfs

[rsyncd_server]
backup

[rsyncd_client:children]
lb_group
web_group
db_group
nfs_server


[root@m01 ansible]# vim /etc/hosts
172.16.1.7 web01
172.16.1.8 web02
172.16.1.51 db01
172.16.1.5 lb01
172.16.1.6 lb02
172.16.1.31 nfs
172.16.1.41 backup
2.配置优化部分
[root@m01 ~]# vim /product/roles/base/tasks/stop_fire.yml
- name: Stop Firewalld
  systemd:
    name: firewalld
    state: stopped

- name: Stop selinux
  selinux:
    state: disabled

[root@m01 ~]# vim /product/roles/base/tasks/create_user.yml
- name: Create www Group
  group:
    name: www
    gid: 666
    state: present

- name: Create www User
  user:
    name: www
    uid: 666
    group: www
    shell: /sbin/nologin
    create_home: false
    state: present

[root@m01 ~]# vim /product/roles/base/tasks/main.yml
- include_tasks: stop_fire.yml
- include_tasks: create_user.yml
3.安装nginx部分
#1.准备包和配置文件
[root@m01 ~]# ll /product/roles/nginx/files/
total 772
-rw-r--r-- 1 root root 784272 Mar 22 22:02 nginx-1.16.1-1.el7.ngx.x86_64.rpm
-rw-r--r-- 1 root root    640 Mar 27 10:37 nginx.conf

#2.编写安装nginx的playbook
[root@m01 ~]# vim /product/roles/nginx/tasks/main.yml
- name: Copy Nginx rpm
  copy:
    src: nginx-1.16.1-1.el7.ngx.x86_64.rpm
    dest: /tmp

- name: Install Nginx Server
  yum:
    name: /tmp/nginx-1.16.1-1.el7.ngx.x86_64.rpm
    state: present

- name: Config Nginx Server
  copy:
    src: nginx.conf
    dest: /etc/nginx/
  notify: restart nginx

- name: Start Nginx Server
  systemd:
    name: nginx
    state: started
    enabled: yes

#3.编写触发器内容
[root@m01 ~]# vim /product/roles/nginx/handlers/main.yml
- name: restart nginx
  systemd:
    name: nginx
    state: restarted
4.安装php
#1.准备文件
[root@m01 ~]# ll /product/roles/php/files/
total 19444
-rw-r--r-- 1 root root 19889622 Mar 22 21:58 php.tar.gz
-rw-r--r-- 1 root root    17962 Mar 23 17:35 www.conf

#2.编写安装php的playbook
[root@m01 product]# vim roles/php/tasks/main.yml
- name: Tar php Package
  unarchive:
    src: php.tar.gz
    dest: /tmp/

- name: Get PHP Install Status
  stat:
    path: /etc/php-fpm.d
  register: get_php_install_status

- name: Install PHP Server
  shell: "yum localinstall -y /tmp/*.rpm"
  when: get_php_install_status.stat.exists == false

- name: Config PHP Server
  copy:
    src: www.conf
    dest: /etc/php-fpm.d/
  notify: restart_php

- name: Start PHP Server
  systemd:
    name: php-fpm
    state: started
    enabled: yes

#3.配置触发器
[root@m01 product]# vim roles/php/handlers/main.yml
- name: restart_php
  systemd:
    name: php-fpm
    state: restarted
5.安装mariadb
[root@m01 product]# vim roles/mariadb/tasks/main.yml
- name: Install Mariadb Server
  yum:
    name: "{{ item.name }}"
    state: present
  with_items:
    - { name: "mariadb-serevr" }
    - { name: "MySQL-python" }

- name: Start Mariadb Server
  systemd:
    name: maraidb
    state: started
    enabled: yes
6.搭建博客
#1.准备文件
[root@m01 files]# ll /product/roles/wordpress/files/
total 10848
-rw-r--r-- 1 root root      347 Mar 26 11:49 blog.conf
-rw-r--r-- 1 root root 11102857 Mar 25 08:57 blog.tar.gz

#2.编写搭建wordpress的playbook
[root@m01 ~]# vim /product/roles/wordpress/tasks/main.yml
- name: Config wordpress Conf
  copy:
    src: blog.conf
    dest: /etc/nginx/conf.d/
  notify: restart_nginx

- name: Tar wordpress Package
  unarchive:
    src: blog.tar.gz
    dest: /

- name: Chown Code Dir
  file:
    path: /code
    state: directory
    owner: www
    group: www
    recurse: yes

#3.编写触发器
[root@m01 ~]# vim /product/roles/wordpress/handlers/main.yml
- name: restart_nginx
  systemd:
    name: nginx
    state: restarted

#4.配置wordpress数据库
[root@m01 ~]# ll /product/roles/mariadb/files/
total 44
-rw-r--r-- 1 root root 43025 Mar 24 23:47 wordpress.sql

[root@m01 ~]# vim /product/roles/wordpress/tasks/main.yml
- name: Config wordpress Conf
  copy:
    src: blog.conf
    dest: /etc/nginx/conf.d/
  notify: restart_nginx

- name: Tar wordpress Package
  unarchive:
    src: blog.tar.gz
    dest: /

- name: Chown Code Dir
  file:
    path: /code
    state: directory
    owner: www
    group: www
    recurse: yes
7.搭建负载均衡
#1.环境准备
[root@m01 ~]# ll /product/roles/upstream/templates/
total 4
-rw-r--r-- 1 root root 284 Mar 26 12:25 upstream.j2

#2.编写upstream的playbook
[root@m01 ~]# vim /product/roles/upstream/tasks/main.yml
- name: Config Nginx Upstream Conf
  template:
    src: upstream.j2
    dest: /etc/nginx/conf.d/upstream.conf

- name: Restart Nginx Server
  systemd:
    name: nginx
    state: restarted

#3.配置依赖
[root@m01 ~]# vim /product/roles/upstream/meta/main.yml
dependencies:
  - { role: nginx }


