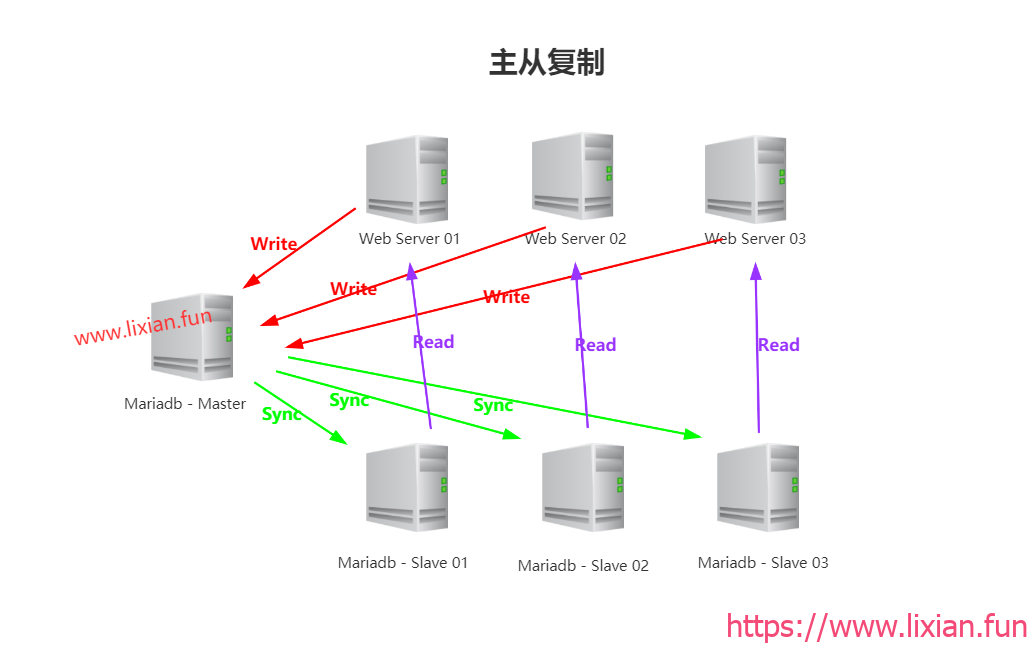
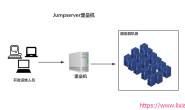
主从复制架构图
一、环境准备
| 主机名 | IP | 作用 |
| db01 | 172.16.1.51 | 主节点 |
| db02 | 172.16.1.52 | 从节点 |
| db03 | 172.16.1.53 | 管理节点 |
二、主从复制搭建
1.安装数据库(所有节点)
[root@db01 ~]# yum install mariadb-server -y
[root@db02 ~]# yum install mariadb-server -y
[root@db03 ~]# yum install mariadb-server -y
2.修改各个节点的my.cnf配置文件
[root@db01 ~]# vim /etc/my.cnf
skip_name_resolve = ON
innodb_file_per_table = ON
server-id = 1
log-bin = mysql-bin
relay-log = relay-log
[root@db02 ~]# vim /etc/my.cnf
skip_name_resolve = ON
innodb_file_per_table = ON
server-id = 2
log-bin = mysql-bin
relay-log = relay-log
read_only = ON
relay_log_purge = 0
log_slave_updates = 1
[root@db03 ~]# vim /etc/my.cnf
skip_name_resolve = ON
innodb_file_per_table = ON
server-id = 3
log-bin = mysql-bin
relay-log = relay-log
read_only = ON
relay_log_purge = 0
log_slave_updates = 1
3.所有节点重启数据库服务
[root@db01 ~]# systemctl restart mariadb
[root@db02 ~]# systemctl restart mariadb
[root@db03 ~]# systemctl restart mariadb
4.所有节点建立slave用户
[root@db01 ~]# mysql
MariaDB [(none)]> grant replication slave on *.* to 'slave'@'172.16.1.%' identified by '123456';
[root@db02 ~]# mysql
MariaDB [(none)]> grant replication slave on *.* to 'slave'@'172.16.1.%' identified by '123456';
[root@db03 ~]# mysql
MariaDB [(none)]> grant replication slave on *.* to 'slave'@'172.16.1.%' identified by '123456';
5.查看主节点的状态(并记住File和Position 的值)
[root@db01 ~]# mysql
MariaDB [(none)]> show master status;
+------------------+----------+--------------+------------------+
| File             | Position | Binlog_Do_DB | Binlog_Ignore_DB |
+------------------+----------+--------------+------------------+
| mysql-bin.000003 |      397 |              |                  |
+------------------+----------+--------------+------------------+
1 row in set (0.00 sec)
6.从节点连接主节点(只需要在db02和db03分别操作)
MariaDB [(none)]> set global read_only=1;
Query OK, 0 rows affected (0.00 sec)

MariaDB [(none)]> change master to
    ->     master_host='172.16.1.51',
    ->     master_user='slave',
    ->     master_password='123456',
    ->     master_log_file='mysql-bin.000003',
    ->     master_log_pos=397;
Query OK, 0 rows affected (0.06 sec)
7.打开从节点(只需要在db02和db03分别操作)
MariaDB [(none)]> start slave;
Query OK, 0 rows affected (0.00 sec)
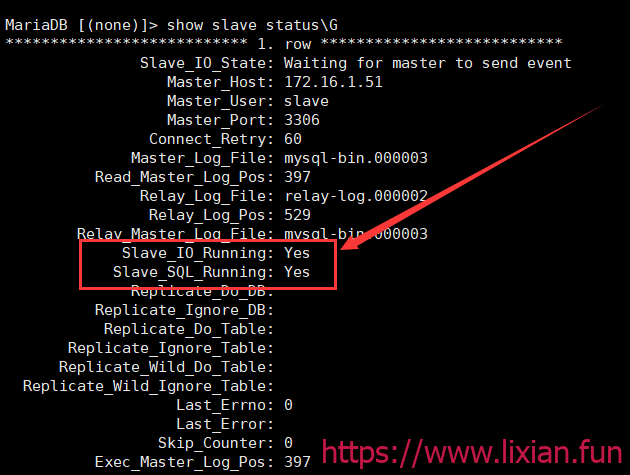
8.查看两个从节点(下面两个参数为Yes则主从复制成功)
MariaDB [(none)]> show slave status\G
Slave_IO_Running: Yes
Slave_SQL_Running: Yes
三、配置MHA
1.主节点建立mha用户
[root@db01 ~]# mysql
MariaDB [(none)]> grant all on *.* to 'mha'@'172.16.1.%' identified by 'mha';
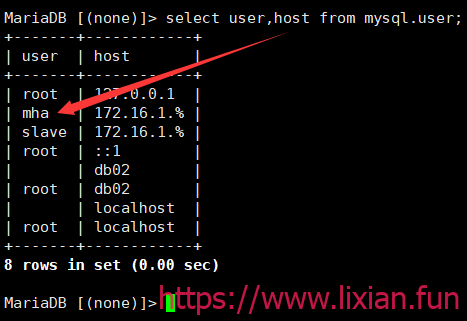
2.如果主从复制成功,另外两个节点则有mha用户
MariaDB [(none)]> select user,host from mysql.user;
3.三台节点实现相互免密连接脚本
三台机器分别运行这个脚本即可实现相互免密连接。
#!/bin/bash
. /etc/rc.d/init.d/functions

yum install sshpass -y  >/dev/null
# 创建密钥
\rm ~/.ssh/id_rsa* -f
ssh-keygen -t rsa -f ~/.ssh/id_rsa -N "" -q
# 分发公钥
for ip in 51 52 53
do
sshpass -p1 ssh-copy-id -o "StrictHostKeyChecking no"  -i /root/.ssh/id_rsa.pub 172.16.1.$ip &>/dev/null
if [ $? -eq 0 ];then
action  "服务器:172.16.1.$ip 密钥分发成功"  /bin/true
else
action  "未检测到172.16.1.$ip服务器,快去检查一下吧!"  /bin/false
fi
done
4.所有节点安装mha-node的rpm包
yum install -y perl perl-DBI perl-DBD-MySQL perl-IO-Socket-SSL perl-Config-Tiny perl-Log-Dispatch perl-Parallel-ForkManager perl-Time-HiRes
rpm -ivh mha4mysql-node-0.56-0.el6.noarch.rpm
Preparing...                          ################################# [100%]
Updating / installing...
   1:mha4mysql-node-0.56-0.el6        ################################# [100%]
5.管理节点安装manager-rpm包
[root@db03 ~]# ll
total 128
-rw-r--r-- 1 root root 87119 Apr  3 12:08 mha4mysql-manager-0.56-0.el6.noarch.rpm
-rw-r--r-- 1 root root 36326 Apr  3 12:08 mha4mysql-node-0.56-0.el6.noarch.rpm
-rw-r--r-- 1 root root   480 Apr  6 19:07 test.sh
[root@db03 ~]# rpm -ivh mha4mysql-manager-0.56-0.el6.noarch.rpm
Preparing...                          ################################# [100%]
Updating / installing...
   1:mha4mysql-manager-0.56-0.el6     ################################# [100%]
6.管理节点创建mha目录及脚本目录
[root@db03 ~]# mkdir -p /etc/mha/scripts
[root@db03 ~]# mkdir -p /var/log/mha/app1
7.管理节点编写mha配置文件
[root@db03 ~]# vim /etc/mha/app1.cnf
[server default]
manager_log=/var/log/mha/app1/manager.log
manager_workdir=/var/log/mha/app1
master_binlog_dir=/var/lib/mysql
master_ip_failover_script= /etc/mha/scripts/master_ip_failover
master_ip_online_change_script=/etc/mha/scripts/master_ip_online_change

user=mha
password=mha
ssh_user=root
repl_password=123456
repl_user=slave
ping_interval=1

[server1]
hostname=172.16.1.51
port=3306

[server2]
hostname=172.16.1.52
port=3306
candidate_master=1
check_repl_delay=0

[server3]
hostname=172.16.1.53
port=3306
8.配置VIP漂移
编写master_ip_failover脚本
[root@db03 ~]# vim /etc/mha/scripts/master_ip_failover
#!/usr/bin/env perl

use strict;
use warnings FATAL => 'all';

use Getopt::Long;

my (
    $command,          $ssh_user,        $orig_master_host, $orig_master_ip,
    $orig_master_port, $new_master_host, $new_master_ip,    $new_master_port
);

my $vip = '172.16.1.50/24';
my $key = '1';
my $ssh_start_vip = "/sbin/ifconfig eth1:$key $vip";
my $ssh_stop_vip = "/sbin/ifconfig eth1:$key down";

GetOptions(
    'command=s'          => \$command,
    'ssh_user=s'         => \$ssh_user,
    'orig_master_host=s' => \$orig_master_host,
    'orig_master_ip=s'   => \$orig_master_ip,
    'orig_master_port=i' => \$orig_master_port,
    'new_master_host=s'  => \$new_master_host,
    'new_master_ip=s'    => \$new_master_ip,
    'new_master_port=i'  => \$new_master_port,
);

exit &main();

sub main {

    print "\n\nIN SCRIPT TEST====$ssh_stop_vip==$ssh_start_vip===\n\n";

    if ( $command eq "stop" || $command eq "stopssh" ) {

        my $exit_code = 1;
        eval {
            print "Disabling the VIP on old master: $orig_master_host \n";
            &stop_vip();
            $exit_code = 0;
        };
        if ($@) {
            warn "Got Error: $@\n";
            exit $exit_code;
        }
        exit $exit_code;
    }
    elsif ( $command eq "start" ) {

        my $exit_code = 10;
        eval {
            print "Enabling the VIP - $vip on the new master - $new_master_host \n";
            &start_vip();
            $exit_code = 0;
        };
        if ($@) {
            warn $@;
            exit $exit_code;
        }
        exit $exit_code;
    }
    elsif ( $command eq "status" ) {
        print "Checking the Status of the script.. OK \n";
        exit 0;
    }
    else {
        &usage();
        exit 1;
    }
}

sub start_vip() {
    `ssh $ssh_user\@$new_master_host \" $ssh_start_vip \"`;
}
sub stop_vip() {
     return 0  unless  ($ssh_user);
    `ssh $ssh_user\@$orig_master_host \" $ssh_stop_vip \"`;
}

sub usage {
    print
    "Usage: master_ip_failover --command=start|stop|stopssh|status --orig_master_host=host --orig_master_ip=ip --orig_master_port=port --new_master_host=host --new_master_ip=ip --new_master_port=port\n";
}
编写master_ip_online_change脚本
[root@db03 ~]# vim /etc/mha/scripts/master_ip_online_change
#!/bin/bash
source /root/.bash_profile
vip=`echo '172.16.1.50/24'`  #设置VIP
key=`echo '1'`

command=`echo "$1" | awk -F = '{print $2}'`
orig_master_host=`echo "$2" | awk -F = '{print $2}'`
new_master_host=`echo "$7" | awk -F = '{print $2}'`
orig_master_ssh_user=`echo "${12}" | awk -F = '{print $2}'`
new_master_ssh_user=`echo "${13}" | awk -F = '{print $2}'`

#要求服务的网卡识别名一样,都为eth1(这里是)
stop_vip=`echo "ssh root@$orig_master_host /usr/sbin/ifconfig eth1:$key down"`
start_vip=`echo "ssh root@$new_master_host /usr/sbin/ifconfig eth1:$key $vip"`

if [ $command = 'stop' ]
	 then
	  echo -e "\n\n\n****************************\n"
	   echo -e "Disabled thi VIP - $vip on old master: $orig_master_host \n"
	   $stop_vip
	   if [ $? -eq 0 ]
	     then
		echo "Disabled the VIP successfully"
	      else
		echo "Disabled the VIP failed"
	    fi
	    echo -e "***************************\n\n\n"
	  fi

if [ $command = 'start' -o $command = 'status' ]
	  then
	    echo -e "\n\n\n*************************\n"
	    echo -e "Enabling the VIP - $vip on new master: $new_master_host \n"
	    $start_vip
	    if [ $? -eq 0 ]
	      then
		echo "Enabled the VIP successfully"
	      else
		echo "Enabled the VIP failed"
	   fi
	   echo -e "***************************\n\n\n"
fi
9.授权脚本
[root@db03 ~]# chmod +x /etc/mha/scripts/master_ip_failover
[root@db03 ~]# chmod +x /etc/mha/scripts/master_ip_online_change
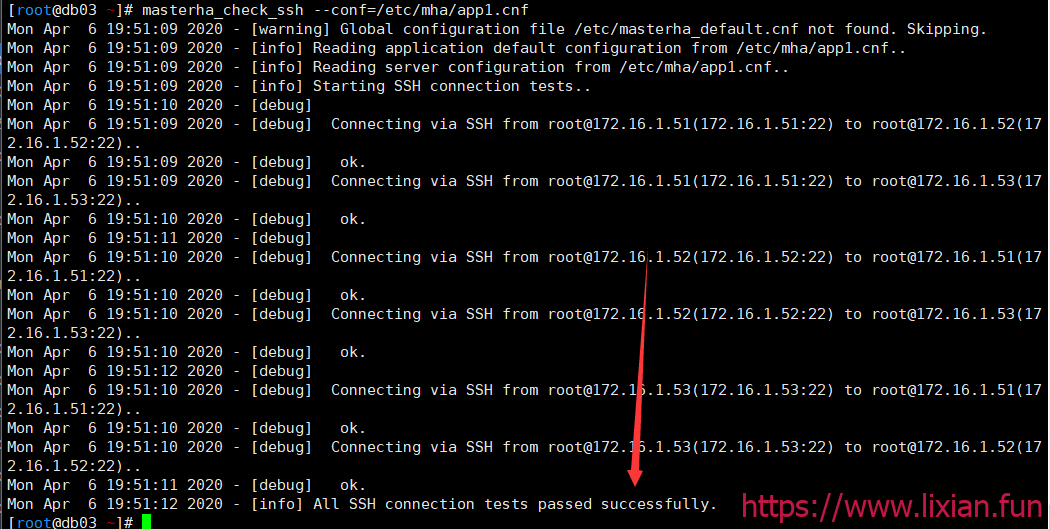
10.管理节点测试ssh信任是否连接(successfully则成功)
[root@db03 ~]# masterha_check_ssh --conf=/etc/mha/app1.cnf
Mon Apr  6 19:51:09 2020 - [warning] Global configuration file /etc/masterha_default.cnf not found. Skipping.
Mon Apr  6 19:51:09 2020 - [info] Reading application default configuration from /etc/mha/app1.cnf..
Mon Apr  6 19:51:09 2020 - [info] Reading server configuration from /etc/mha/app1.cnf..
Mon Apr  6 19:51:09 2020 - [info] Starting SSH connection tests..
......
......
......
Mon Apr  6 19:51:11 2020 - [debug]   ok.
Mon Apr  6 19:51:12 2020 - [info] All SSH connection tests passed successfully.
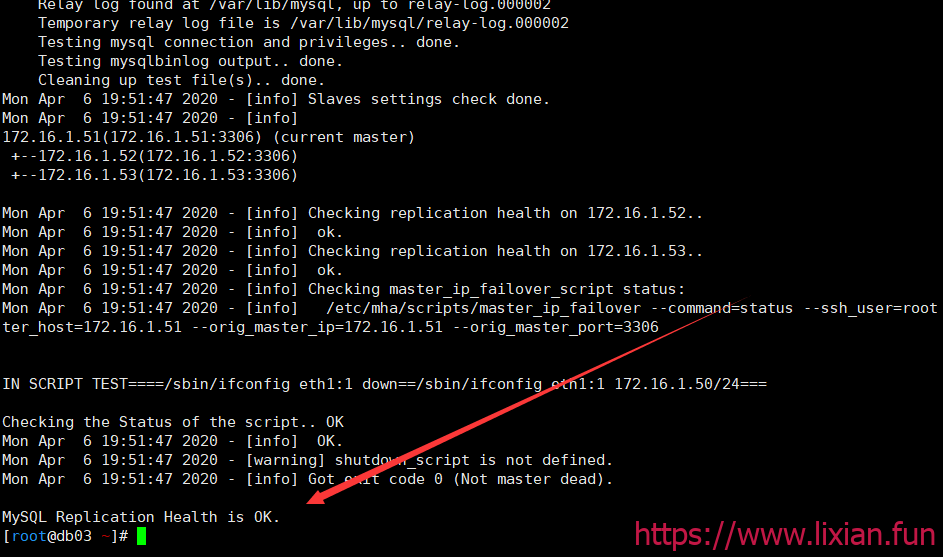
11.管理节点验证主从复制是否成功(is OK 则成功)
[root@db03 ~]# masterha_check_repl --conf=/etc/mha/app1.cnf
Mon Apr  6 19:51:41 2020 - [warning] Global configuration file /etc/masterha_default.cnf not found. Skipping.
Mon Apr  6 19:51:41 2020 - [info] Reading application default configuration from /etc/mha/app1.cnf..
Mon Apr  6 19:51:41 2020 - [info] Reading server configuration from /etc/mha/app1.cnf..
Mon Apr  6 19:51:41 2020 - [info] MHA::MasterMonitor version 0.56.
......
......
......
Mon Apr  6 19:51:47 2020 - [info] Got exit code 0 (Not master dead).

MySQL Replication Health is OK.
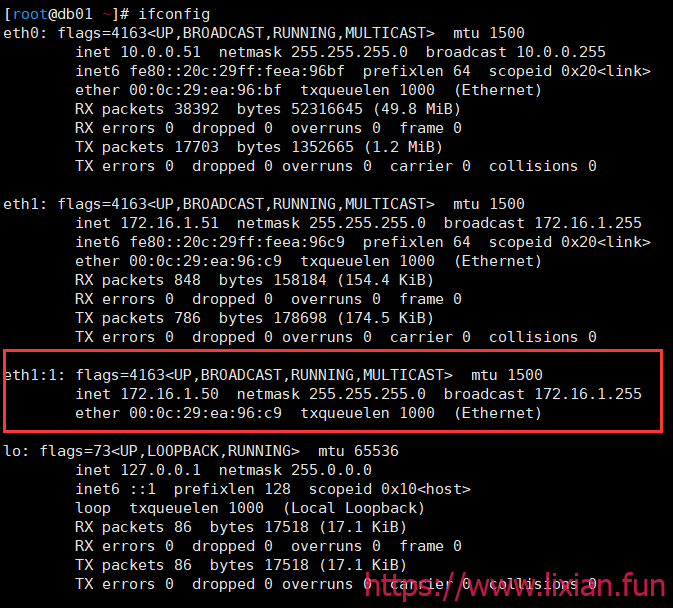
12.主节点绑定网卡
[root@db01 ~]# ifconfig eth1:1 172.16.1.50/24
13.在管理节点上启动mha
[root@db03 ~]# masterha_manager --conf=/etc/mha/app1.cnf --remove_dead_master_conf --ignore_last_failover < /dev/null > /var/log/mha/app1/manager.log 2>&1
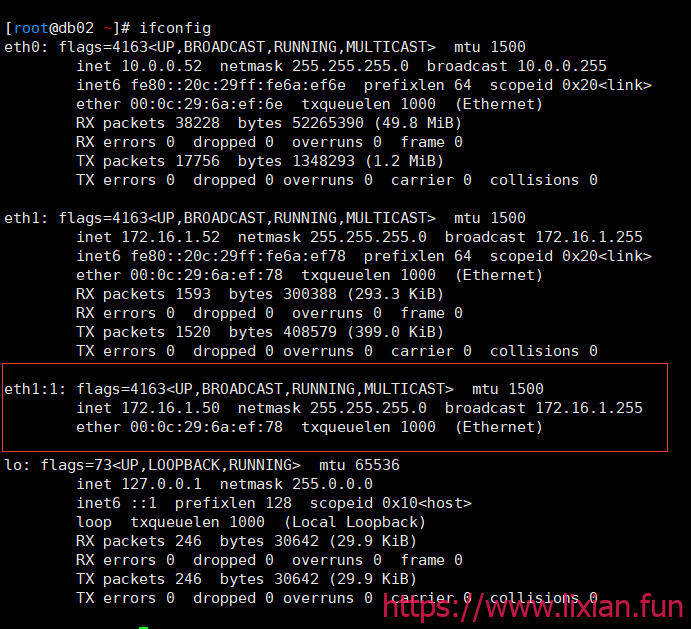
14.主节点ifconfig查看网卡状态(发现多了个eth1:1)
此时,关闭主节点的数据库(模拟主节点数据库炸了)
[root@db01 ~]# systemctl stop mariadb
到从节点(db02主机)查看eth1:1已经漂移到这个节点上了
