一、前言
当Kvm宿主机越来越多,需要对宿主机的状态进行调控,决定采用WebVirtMgr作为Kvm虚拟化的web管理工具,图形化的WEB,让人能更方便的查看Kvm宿主机的情况和操作。
WebVirtMgr是近两年来发展较快,比较活跃,非常清新的一个Kvm管理平台,提供对宿主机和虚机的统一管理,它有别于Kvm自带的图形管理工具(virtual machine manager),让Kvm管理变得更为可视化,对中小型Kvm应用场景带来了更多方便。
WebVirtMgr采用几乎纯Python开发,其前端是基于Python的Django,后端是基于Libvirt的Python接口,将日常Kvm的管理操作变的更加的可视化。
二、特点
操作简单,易于使用
通过libvirt的API接口对Kvm进行管理
提供对虚拟机生命周期管理
三、功能
#宿主机管理支持以下功能
CPU利用率
内存利用率
网络资源池管理
存储资源池管理
虚拟机镜像
虚拟机克隆
快照管理
日志管理
虚机迁移
#虚拟机管理支持以下功能
CPU利用率
内存利用率
光盘管理
关/开/暂停虚拟机
安装虚拟机
VNC console连接
创建快照
四、部署WebVirtMgr
1. 安装相关依赖
官网:https://github.com/retspen/webvirtmgr/wiki/Install-WebVirtMgr 首先要安装Kvm虚拟化环境,这里我将WebVirtMgr服务器和Kvm服务器放在同一台机器上部署的,即单机部署。 #1.安装epel源 [root@kvm01 ~]# yum install epel-release #2.安装依赖及环境 [root@kvm01 ~]# yum -y install git python-pip libvirt-python libxml2-python python-websockify supervisor nginx #3.安装编译软件 [root@kvm01 ~]# yum -y install gcc python-devel #4.安装numpy(Python进行科学计算的基础软件包) [root@kvm01 ~]# pip install numpy -i https://pypi.tuna.tsinghua.edu.cn/simple
如果安装numpy出现下面报错,执行 pip install –upgrade pip 命令
2. 安装Python需求环境
#1.从git-hub中下载相关的webvirtmgr代码 [root@kvm01 ~]# git clone git://github.com/retspen/webvirtmgr.git Cloning into 'webvirtmgr'... remote: Enumerating objects: 5614, done. remote: Total 5614 (delta 0), reused 0 (delta 0), pack-reused 5614 Receiving objects: 100% (5614/5614), 2.98 MiB | 550.00 KiB/s, done. Resolving deltas: 100% (3602/3602), done. #2.安装WebVirtMgr [root@kvm01 ~]# cd webvirtmgr/ [root@kvm01 ~/webvirtmgr]# pip install -r requirements.txt -i https://pypi.tuna.tsinghua.edu.cn/simple #3.检查sqlite3 (备注:自带不需要安装,导入模块检查一下。) [root@kvm01 ~/webvirtmgr]# python Python 2.7.5 (default, Apr 2 2020, 13:16:51) [GCC 4.8.5 20150623 (Red Hat 4.8.5-39)] on linux2 Type "help", "copyright", "credits" or "license" for more information. >>> import sqlite3 >>> exit() #4.初始化账号 [root@kvm01 ~/webvirtmgr]# chmod +x manage.py [root@kvm01 ~/webvirtmgr]# ./manage.py syncdb WARNING:root:No local_settings file found. Creating tables ... Creating table auth_permission Creating table auth_group_permissions Creating table auth_group Creating table auth_user_groups Creating table auth_user_user_permissions Creating table auth_user Creating table django_content_type Creating table django_session Creating table django_site Creating table servers_compute Creating table instance_instance Creating table create_flavor You just installed Django's auth system, which means you don't have any superusers defined. Would you like to create one now? (yes/no): yes Username (leave blank to use 'root'): root Email address: root@qq.com Password: Password (again): Superuser created successfully. Installing custom SQL ... Installing indexes ... Installed 6 object(s) from 1 fixture(s) #5.生成配置文件 [root@kvm01 ~/webvirtmgr]# ./manage.py collectstatic WARNING:root:No local_settings file found. You have requested to collect static files at the destination location as specified in your settings. This will overwrite existing files! Are you sure you want to do this? Type 'yes' to continue, or 'no' to cancel: yes #6.添加管理员账号,这个是管理员账号,用上面的root和这个admin账号都可以登录 [root@kvm01 ~/webvirtmgr]# ./manage.py createsuperuser WARNING:root:No local_settings file found. Username: admin Email address: admin@qq.com Password: Password (again): Superuser created successfully. #7.拷贝web到相关目录 [root@kvm01 ~/webvirtmgr]# mkdir -p /var/www/ [root@kvm01 ~/webvirtmgr]# cp -rp /root/webvirtmgr /var/www/ #8.设置ssh [root@kvm01 ~/webvirtmgr]# cd [root@kvm01 ~]# ssh-keygen -t rsa #一路回车 [root@kvm01 ~]# ssh-copy-id -i .ssh/id_rsa.pub root@10.0.0.111 #10.0.0.111为本机IP,输入yes之后输入本机密码即可 #设置加密连接 [root@kvm01 ~]# ssh root@10.0.0.111 -L localhost:8000:localhost:8000 -L localhost:6080:localhost:6080Last login: Fri Jul 31 15:54:43 2020 from 10.0.0.1
3. 配置Nginx
#1.打开/etc/nginx/nginx.conf文件,注释server层
[root@kvm01 ~]# vim /etc/nginx/nginx.conf
#2.编辑配置文件
[root@kvm01 ~]# vim /etc/nginx/conf.d/webvirtmgr.conf
server {
listen 80 default_server;
server_name $hostname;
#access_log /var/log/nginx/webvirtmgr_access_log;
location /static/ {
root /var/www/webvirtmgr/webvirtmgr; # or /srv instead of /var
expires max;
}
location ~ .*\.(js|css)$ {
proxy_pass http://127.0.0.1:8000;
}
location / {
proxy_pass http://127.0.0.1:8000;
proxy_set_header X-Real-IP $remote_addr;
proxy_set_header X-Forwarded-for $proxy_add_x_forwarded_for;
proxy_set_header Host $host:$server_port;
proxy_set_header X-Forwarded-Proto $scheme;
proxy_connect_timeout 600;
proxy_read_timeout 600;
proxy_send_timeout 600;
client_max_body_size 1024M; # Set higher depending on your needs
}
}
#3.重新启动nginx服务
[root@kvm01 ~]# systemctl start nginx
[root@kvm01 ~]# systemctl enable nginx
#4.设置权限
[root@kvm01 ~]# chown -R nginx:nginx /var/www/webvirtmgr
#5.创建/etc/supervisord.d/webvirtmgr.ini具有以下内容的文件
[root@kvm01 ~]# vim /etc/supervisord.d/webvirtmgr.ini
[program:webvirtmgr]
command=/usr/bin/python /var/www/webvirtmgr/manage.py run_gunicorn -c /var/www/webvirtmgr/conf/gunicorn.conf.py
directory=/var/www/webvirtmgr
autostart=true
autorestart=true
logfile=/var/log/supervisor/webvirtmgr.log
log_stderr=true
user=nginx
[program:webvirtmgr-console]
command=/usr/bin/python /var/www/webvirtmgr/console/webvirtmgr-console
directory=/var/www/webvirtmgr
autostart=true
autorestart=true
stdout_logfile=/var/log/supervisor/webvirtmgr-console.log
redirect_stderr=true
user=nginx
#6.启动守护进程supervisord
[root@kvm01 ~]# systemctl start supervisord.service
[root@kvm01 ~]# systemctl enable supervisord.service
#7.查看端口
[root@kvm01 ~]# netstat -lntp |grep -E '6080|8000'
tcp 0 0 127.0.0.1:6080 0.0.0.0:* LISTEN 13638/ssh
tcp 0 0 127.0.0.1:8000 0.0.0.0:* LISTEN 13638/ssh
tcp6 0 0 ::1:6080 :::* LISTEN 13638/ssh
tcp6 0 0 ::1:8000 :::* LISTEN 13638/ssh
五、Web终端部署
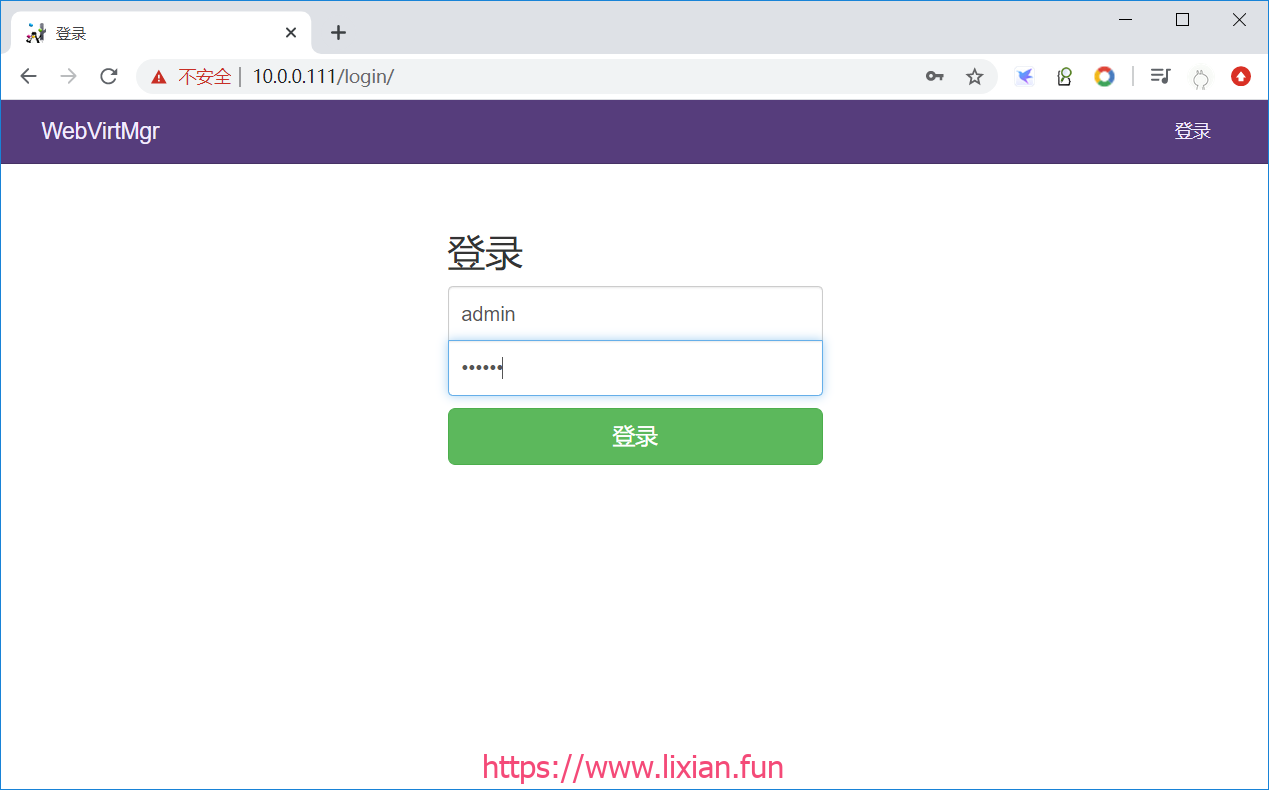
浏览器访问:http://10.0.0.111/login/
1.登录webvirtmgr
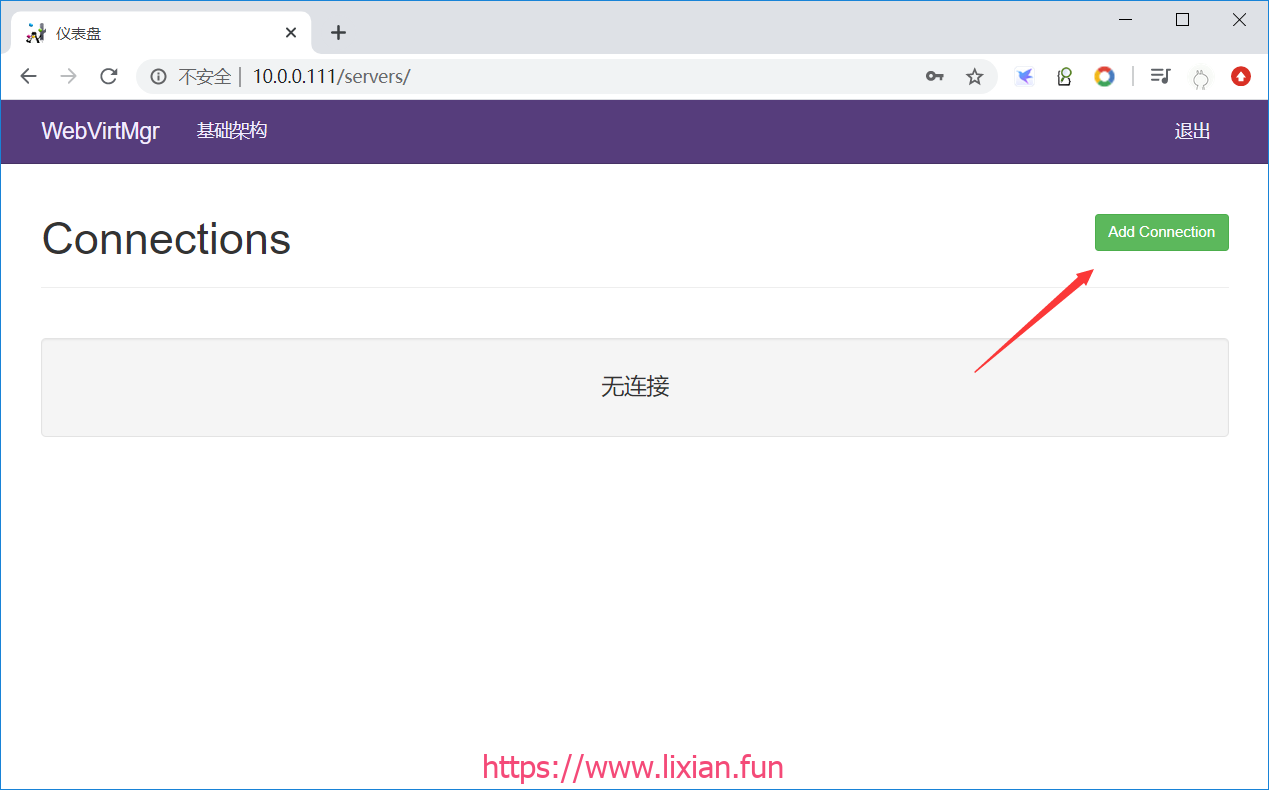
2.添加一个实例主机
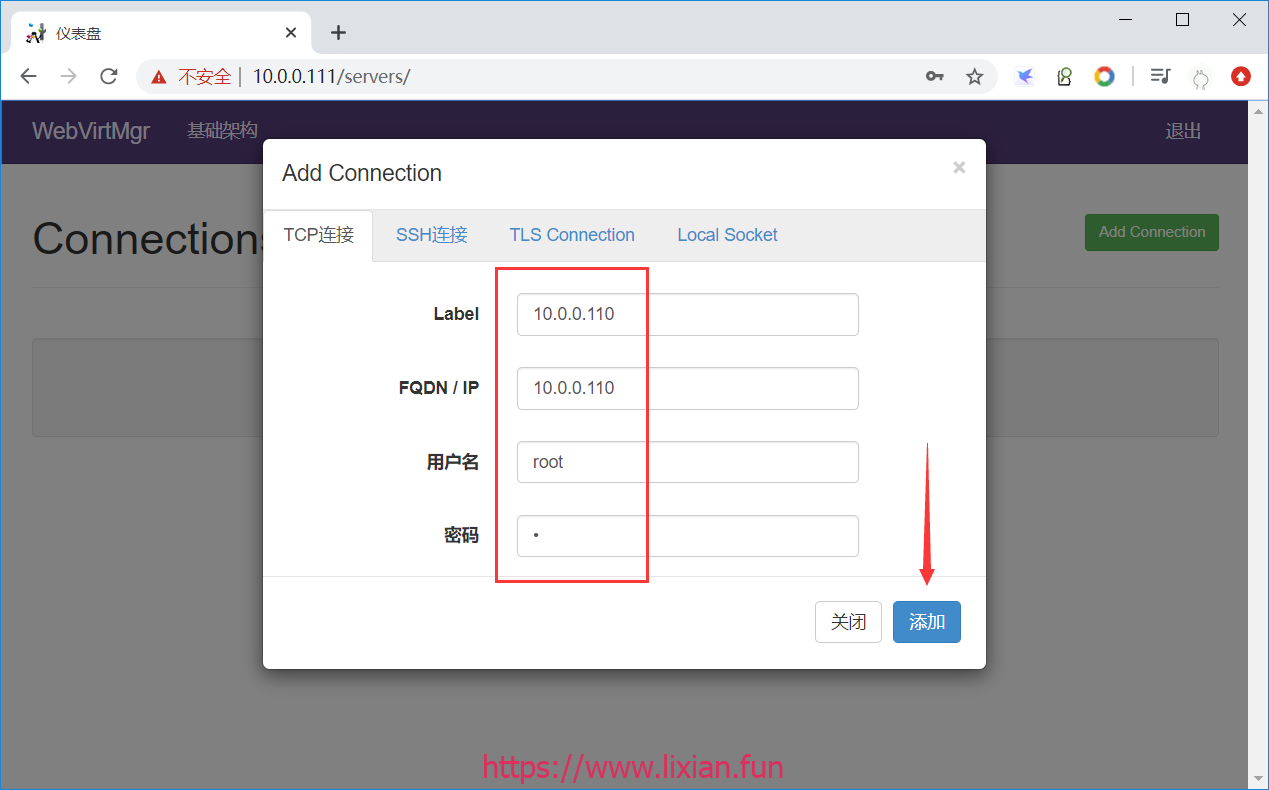
3.通过TCP连接主机
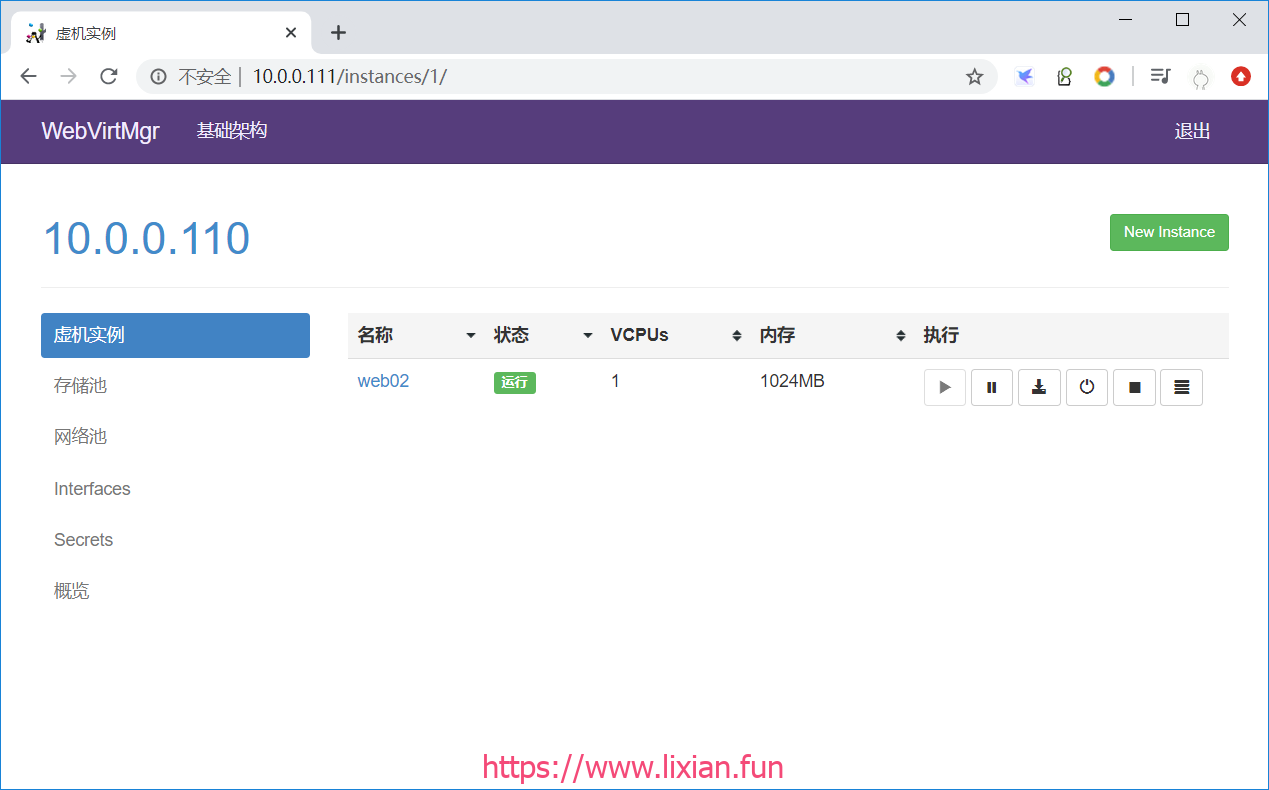
4.可以看到实例主机内的Kvm虚拟机
六、远程连接
#使用tcp进行对远程libvirtd进行连接访问的配置如下:
#1.修改文件/etc/sysconfig/libvirtd,用来启用tcp的端口
[root@kvm01 ~]# grep -Ev "^$|#" /etc/sysconfig/libvirtd
LIBVIRTD_CONFIG=/etc/libvirt/libvirtd.conf
LIBVIRTD_ARGS="--listen"
#2.修改文件/etc/libvirt/libvirtd.conf
[root@kvm01 ~]# grep -Ev '^$|^#' /etc/libvirt/libvirtd.conf
listen_tls = 0
listen_tcp = 1
tcp_port = "16509"
listen_addr = "0.0.0.0"
auth_tcp = "none"
#3.重启libvirtd
[root@kvm01 ~]# systemctl restart libvirtd
#4.查看端口16509是否启动
[root@kvm01 ~]# netstat -lntp|grep 16509
tcp 0 0 0.0.0.0:16509 0.0.0.0:* LISTEN 14039/libvirtd
#5.在source host连接dest host远程libvirtd查看信息
[root@kvm01 ~]# virsh -c qemu+tcp://10.0.0.111/system
Welcome to virsh, the virtualization interactive terminal.
Type: 'help' for help with commands
'quit' to quit
virsh # quit #
七、更新控制台显示
[root@kvm01 ~]# cd /var/www/webvirtmgr

#git pull更新
[root@kvm01 /var/www/webvirtmgr]# git pull
Already up-to-date.

#执行manage.py
[root@kvm01 /var/www/webvirtmgr]# ./manage.py collectstatic
WARNING:root:No local_settings file found.

You have requested to collect static files at the destination
location as specified in your settings.

This will overwrite existing files!
Are you sure you want to do this?

Type 'yes' to continue, or 'no' to cancel: yes          #输入yes

0 static files copied, 75 unmodified.

#重启supervisord
[root@kvm01 /var/www/webvirtmgr]# systemctl  restart  supervisord.service

